Posts

    Tuesday, 21 July 2015

    Error 500: The template is updated in other place. Please reload the original page and retry it again

    When I edited my layout in Blogger and tried to preview it, I used to get the following error:
    The template is updated in other place. Please reload the original page and retry it again
    Then when i tried to save the layout, I used to get this error
    The server was unable to save the form at this time. Please try again
    After searching a lot on google, I found out that adding mobile only widgets causes this problem.
    So, I followed the following steps to fix the issue.

    Go to Template -> Edit HTML

    Then search for mobile="only". You might find something like this:

    <b:widget id='HTML4' locked='false' mobile='only' title='Mobile ad' type='HTML'>

    Change this to:

    <b:widget id='HTML4' locked='false' mobile='yes' title='Mobile ad' type='HTML'>


    This will solve the problem. I think google should do something regarding this problem as it is not that straightforward to fix this.

    Wednesday, 15 July 2015

    ERR_TUNNEL_CONNECTION_FAILED on mobile network on android

    For the past few days, whenever I tried to access any site with HTTPS, I used to get this error.


    "This webpage is not available
    ERR_TUNNEL_CONNECTION_FAILED"

    This used to occur only on mobile network (airtel) and not on WiFi. At first it seemed to be a problem with chrome. But the same problem was there in other browsers. After breaking my head for a while I read somewhere that android doesn't support SSL over any port other than 443 (too weird to be true). But this couldn't be the issue because https://google.com , https://twitter.com etc use 443. 

    Upon investigating further, I realized that it is a very silly issue. It is because the default Access Point (Airtel Live) that came with my carrier (airtel) had a proxy that was not allowing SSL Tunneling.


    After setting Proxy and Port to nothing, the problem was solved!

    Monday, 6 July 2015

    Celebrating the return of Dragon Ball: Kamehameha boot animation


    I am sure many of you are excited about the return of DragonBall after 18 years as DragonBall Super! Although I saw the original series much after it ended, I am a great fan of it and the fact that it gave birth to a new generation of anime is just amazing. Hats off to you Akira Toriyama!

    To celebrate the return of DragonBall, I made a video of me performing the classic Kamehameha attack and made it my phone's boot animation. Here is the Vine of the video I made:

    .

    Grab the Adobe After Effects project of this video from here.

    Here is how it looks while phone is booting:


    Boot animation in android comes from the file called bootanimation.zip which is at /system/media. This file essentially consists of sets of sequences of images which have to be shown one after the other. Here we need to generate bootanimation.zip with just one sequence of images (extracted from the video) which runs in a loop. As there is no tool which can do this, I wrote a simple shell script.

    Here we have to generate two things.

    1. Folder with sequence of images.
    2. Description of bootanimation.zip, which tells what to do with the images.


    After running this script,  bootanimation.zip is generated. Now move it to /system/media and set the permissions to 0644 (rw-r--r--)


    Now reboot the phone and you are done!

    KAAAAAAMEEEEEEEHAAAAAAMEEEEEHAAAAAAAAAAA!


    Sunday, 21 June 2015

    Play computer games through android wear using Magneto

    I recently wrote an article called "Magneto = Gyroscope + Accelerometer + Geomagnetometer" where in I explained how to use Gyroscope, Accelerometer and Geomagnetometer to map your movements to mouse movements. In this article I will show you how to use Magneto 2.0 to play computer games using your android wear or phone.

    Here is a video of me playing few computer games using my android wear


    How to use it?


    Setup

    Unfortunately, I haven't made a simple way to do this YET. And this is available only for Linux and Mac. If you wan't to give a try you will have to follow all these steps. I am assuming that you have ADT setup.

    Download Magneto apk


    For android wear:
    1. Enable developer options on your android wear and turn on USB debugging. See this to see how to enable bluetooth debugging for your watch.
    2. After you are successfully able to connect to your watch from your computer, install the apk.
      adb install [location to the apk]
    3. You are done. Now go ahead and open it on your wear

    For android phone:
    1. Enable developer options on your android device and turn on USB debugging or ADB over wifi.
    2. Install the apk like any other.
    3. You are done. Now go ahead and open it on your device.
    Linux users have to install xdotool:

    Ubuntu/ Debian users
    sudo apt-get install xdotool
    Fedora users
    sudo yum install xdotool
    Arch users
    sudo packman -S install xdotool

    Start Magneto on computer

    Download this shell script and run it.

    For android wear and linux
    ./nav -lw
    For android wear and OS X
    ./nav -ow
    For android phone and linux
    ./nav -lp
    For android phone and OS X
    ./nav -op

    Calibration

    Calibrate what is left, right, top and bottom.
    1. Hold your device in front of the computer screen. This will be your initial position.
    2. Rotate your hand to left position and click on L. So, this will mark the region beyond it as Left. Then rotate your hand to the right and click on R. This will mark the region beyond it as Right. Similarly, do the same for Top (T) and Bottom(B)


    3. If you feel that you have to redo it, press RESET button and click on the letter. When the letter becomes L (capital L), redo Step 2.

    Playing

    See the video where I am playing Temple Run Online, Tetris and Pacman using my android wear!

    Contributing


    Fork me on github


    There is a lot of scope for improvement. For instance, I haven't written the navigation script for windows. Pull requests are welcome.


    You might have noticed the COMMAND button. It takes voice commands from the user and sends it to the computer. I will talk about that in another article.


    Sunday, 14 June 2015

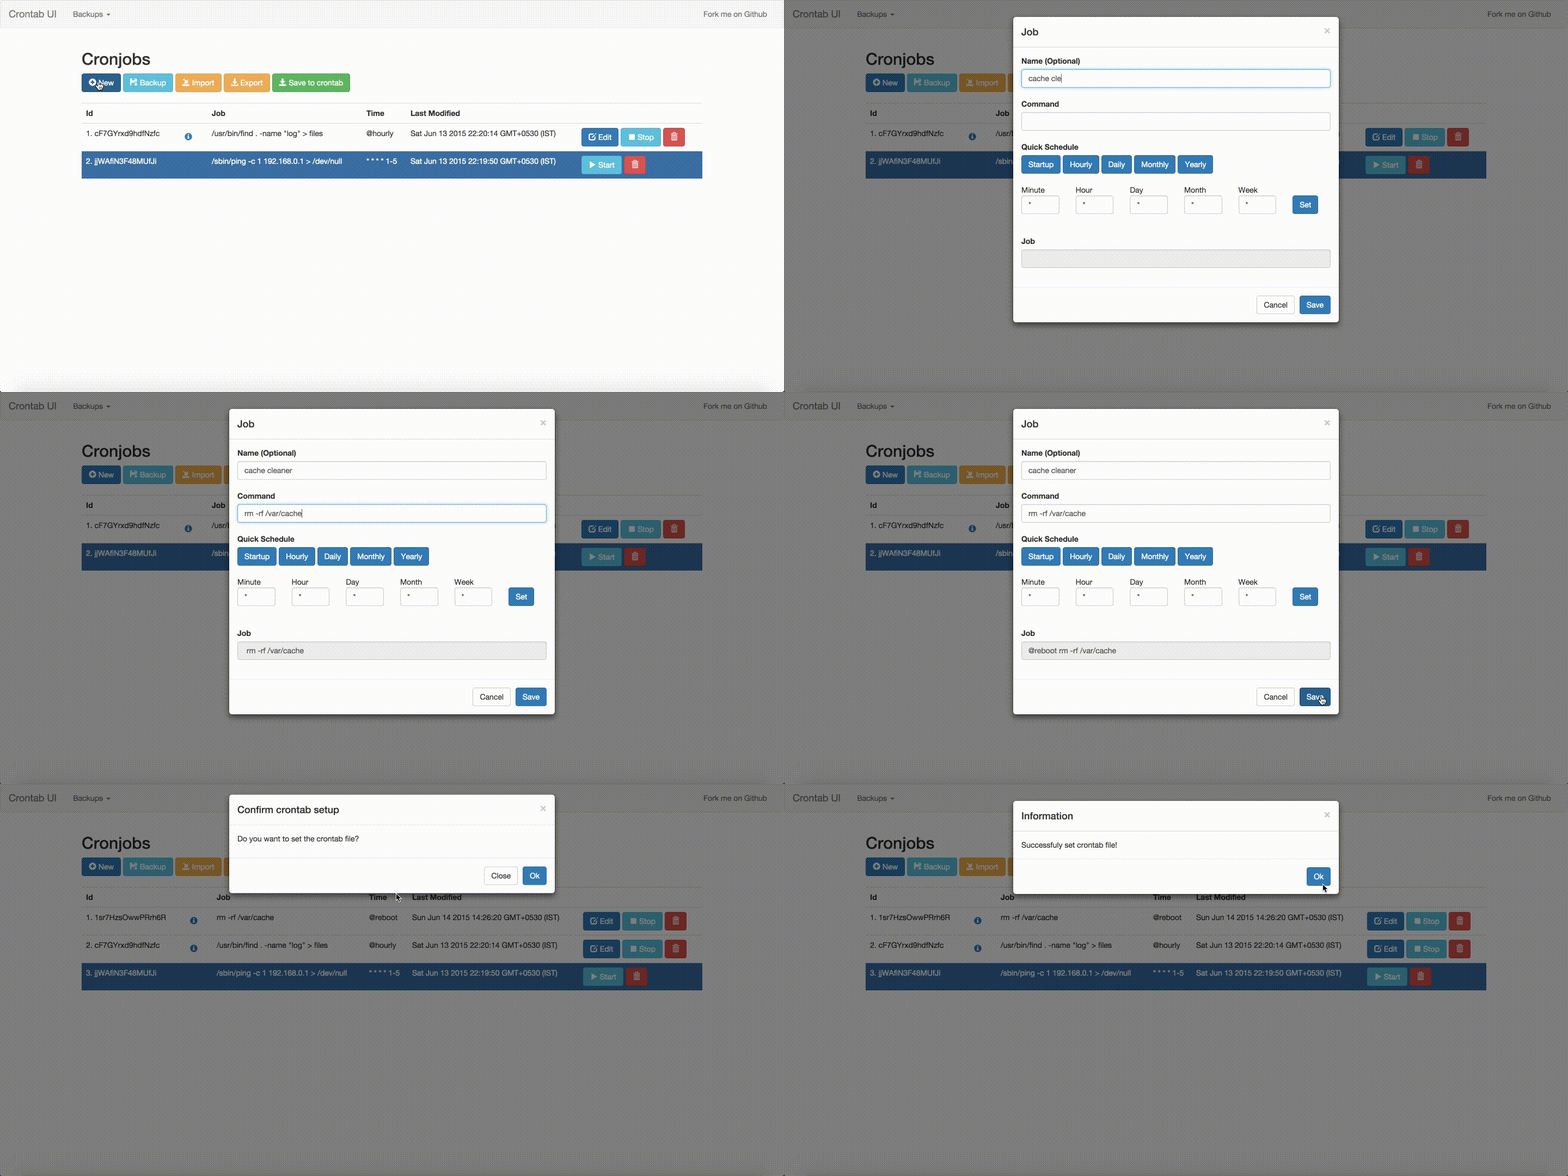
    Crontab UI: easy and safe way to manage your crontab files

    Editing the plain text crontab is error prone for managing jobs, e.g., adding jobs, deleting jobs, or pausing jobs. A small mistake can easily bring down all the jobs and might cost you a lot of time. With Crontab UI, it is very easy to manage crontab.


    Here are the key features of Crontab UI:

    1. Easy Setup
    2. Safe adding, deleting or pausing jobs. Easy to maintain hundreds of jobs.
    3. Backup your crontabs.
    4. Export crontab and deploy on other machines without much hassle.
    5. Error log support

    Fork me on Github

    Setup

    You have to setup crontab-ui on all the machines on which you want to manage crontab. Note that while running Crontab UI, you have to be on the same user as that of the crontab.

    npm install crontab-ui
    crontab-ui

    Adding, deleting, pausing and resuming jobs.

    Once setup Crontab UI provides you with a web interface using which you can manage all the jobs without much hassle.


    Backup and restore crontab

    Keep backups of your crontab in case you mess up.


    Export and import crontab on multiple instances of Crontab UI.


    If you want to run the same jobs on multiple machines simply export from one instance and import the same on the other. No SSH, No copy paste!


    But make sure to take a backup before importing.

    See when the job is going to run next.


    Separate error log support for every job


    These are some of the things I am planning to add in the future


    1. Run jobs as different user in one place.
    2. Profiling jobs.
    3. Importing from existing crontab file.

    Contribute

    Fork Crontab UI and contribute to it. Pull requests are encouraged.


    Tuesday, 2 June 2015

    Some of the cool vim tricks and tips

    I use vim everyday. So much that even to write notes I use vim!
    Here are some of the awesome tricks I have come across:

    1.  Suppose you have opened a file for which you don't have permission. While saving it will say "E212: Can't open file for writing". Now instead of saving this temporarily in another file and then saving in this file, you can do this:

    :w !sudo tee %

    2.  You can edit binary files like in hexedit 

    :%!xxd


    3. Easy diff between two files. Say there are two files 'a' and 'b'. To find the diff of 'a' with respect to 'b'

    :vert diffs b


    4. See command history

    q:


    5. Execute command while still in vim.

    :! <command>

    Here I am compiling and running cpp file without closing it.


    6. Autocomplete whatever you are typing in insert mode based on the words you have typed before:

    Ctrl+n


    7. Directory Listing without NERDTree

    :vsp %:h

    8. Indenting code

    =<next position>
    For example, 
    To indent the current line, press ==
    To indent the code till next closing flower brace, press =}

    Here is an example of indenting the entire code block. Place the cursor on { and then press =%

    Before

    Indented

    9. Make searching as you type instead of after completing typing the entire thing

    :set incsearch

    10. Download and open source code for a given url

    vim http://google.com

    I usually use this to quickly view responses of my web pages.

    vim http://localhost/path


    I will add more in the future.

    Sources:
    http://vim.wikia.com/wiki/Best_Vim_Tips
    What are the dark corners of Vim your mom never told you about?

    Monday, 16 March 2015

    A geek way to wish Happy Birthday!

    There is nothing more awesome than doing regular things in a geeky way. Few days back I was wondering what would be the geekiest way to wish someone happy birthday. It should be geeky alright, but should also have regular things like cake + candles + birthday song + wishing happy birthday.

    Now mixing all this with my very little knowledge in signal processing, I wrote a python code which does this:


    Fork me on github

    How it works?

    So, here we have a virtual cake who's shade has an equalizer effect corresponding to the "happy birthday" song that is played in the background. Here, the cake has candles with flames fluttering randomly. Also, we have a fancy display of happy birthday message.

    Lets see how each of it is done one by one.

    Equalizer effect

    The key here is to consider a sample size of frames in the audio corresponding to the part which is playing currently and display the normalized amplitudes inside the cake. First let's take a look at the amplitudes in the sound wave (stereo):

    Channel L:

    Channel R:

    As we can see even though the audio has two channels, both are nearly the same. Hence for further calculations we will discard one of the channels. If this was not the case, we should have taken the average of both the channels. If the audio file you have taken is already mono, you don't have to worry about anything.

    As there is no negative amplitude in the equalizer effect, we will make all values positive:

    Now that we have the required data, we can iterate over the frames and display the amplitudes in the cake to give equalizer effect. In the current example, I am considering 1500 frames per iteration. No matter how many frames you consider in a given iteration, the total time taken to complete the iteration should be same as the time required to play the song. Hence we add a sleep after every iteration. The net sleep time+processing time should be equal to song's play time.

    We can't display all the 1500 frames at a given time. Hence we take samples in that 1500 frames and averages of each sample is found. The averages are then normalized between the maximum and minimum amplitudes that can occur in the entire song. These normalized averages are then represented as a sequence of 8s (longer the sequence implies higher the amplitude). 

    Walah! you have the equalizer effect.

    There is a serious problem here. The time required for processing, printing on terminal and waking up from sleep are not determinable. For instance printing on xterm happens very fast whereas the mac terminal or gnome-terminal can be very slow. Hence we need to add a manual correction to the sleep time in order to stay in phase with the song which is being played.

    Fluttering candle flames

    If you observe the video, the candle flames can have three states:

    <space> <dot> <space>
    <space> <space> <dot>
    <dot> <space> <space>

    So basically we just have to randomly switch between these three states to get the fluttering candle flame effect.

    Happy birthday text

    I have used figlet to print the message. You can also display with different fonts and sizes.

    Python Code


    Enjoy!


    Sunday, 22 February 2015

    Magneto = Gyroscope + Accelerometer + Geomagnetometer

    I recently participated in a 24hr hackathon where I built a system called Magneto using which people with physical disabilities will be able to control a computer with arm movements and voice commands. This sort of gives the power of Magneto (from Xmen), hence the name!

    Magneto runs on both android phone and wear. Here is a quick view of its working:


    If you are interested to view the source. Github: Magneto

    The intention of this article is not to showcase Magneto, but to explain the physics behind how I was able to map the sensors on android device to mouse movement. While making it, I had used a lot of builtin functions and some help from FusedGyroscopeSensor. Later, I did a lot of research (mainly on linear algebra and rotation physics) to get a clear understanding of the logic. In this article I will clearly explain the learnings.

    Sensors

     I have used 3 sensors available on android device
    1. Accelerometer -  measures the acceleration applied to the device, including the force of gravity.
    2. Geo magnetic sensor - lets you monitor changes in the earth's magnetic field.
    3. Gyroscope - measures the rate or rotation in rad/s around a device's x, y, and z axis.

    Getting the initial rotation matrix

    The initial rotation matrix describes the initial orientation of the device. It is found using accelerometer (for gravity) and geomagnetic sensor. Any vector when multiplied with this rotation matrix should transform it to world coordinate system. This is an identity matrix if the device is aligned with world's coordinate system, that is, when the device's X axis points toward East, the Y axis points to the North Pole and the device is facing the sky.
    Device's coordinate system
    Step 1 Rotate geomagnetic vector (E) over gravity(g) using Rodrigues' rotation formula


    Now normalize the vector


    Step 2 Now normalize gravity vector


    Step 3 Rotate A over H using Rodrigues' rotation formula


    Step 4 The rotation matrix R is represented in terms of H, M and A


    Get current orientations using gyroscope

    Now that we have the initial rotation matrix we can proceed processing the rotations of the device. The gyroscope measures the rate or rotation (not normalized) around a device's x, y, and z axis i.e angular velocity. Also, we keep track of time taken for the device to rotate from its previous position to current position.

    Given that gyroscope works very fast, we can divide one action into several smaller samples in a sequence. Now let us consider one such smaller sample.
    Say the rates(angular velocity) and time taken are:


     "In three-dimensional space, any displacement of a rigid body such that a point on the rigid body remains fixed, is equivalent to a single rotation about some axis that runs through the fixed point."

    It means that any rotation can be expressed as a single rotation about some axis. The axis is the unit vector which remains unchanged by the rotation. Let us determine this angle.

    Angular speed is calculated. It is just the magnitude of angular velocity.


    Angular velocity is normalized. The resultant vector gives us the unit vector in the direction of angular velocity. This is called Euler axis.


    Now that we have magnitude  of angular velocity we can calculate Euler angle.


    Rotation Vector is a 4 dimensional vector called quaternion represented in terms of Euler axis and angle[2] as follows:


    The delta rotation vector is converted to delta rotation matrix. Now, In order to get the resultant rotation matrix, the current rotation matrix is multiplied with the delta rotation matrix.


    Now actual angles i.e angles made by the device with respect to device's coordinates (NOT world coordinates) are determined. See Conversion formulae between formalisms.


    Mapping angles with mouse's coordinates

    Now that we have the required angles, we can determine the desired mouse coordinates. If D is the approximate distance of the device from monitor, D tan θ will give its component on the monitor. Using this concept we can find out the desired X and Y coordinates  of the mouse.


    Repeat this process (except finding initial rotation matrix of course) every time the device moves to determine mouse coordinates.


    NOTE: All formulae were made using Latex and are shared here for your use :)

    Sources:
    [4] Android SDK - SensorManager.java


    Wednesday, 21 January 2015

    WhatsApp Web desktop client for mac


    Whatsapp Messenger finally enabled users to use it from desktop. Unfortunately it is not a desktop client and you have to open the browser all the time to open it. Safari lovers have to open Google Chrome just to open WhatsApp! So I created an unofficial desktop app for mac using which you can get a standalone desktop experience while using it.


    Installing

    Firstly I am assuming that you have installed chrome browser. This will be a wrapper application around Google Chrome. Download the zip file. Extract the zip and simply double click on Whatsapp.app to open it! You can also move it to Applications folder to access it from anywhere. This is how it looks.

    Download WhatsApp for Mac


    How it works

    If you want to make the app yourself, Simply execute the following shell script!


    Now simply open the app!

    Saturday, 17 January 2015

    How to use youtube-dl on android

    There are hundreds of apps on Google Play which claim to download youtube videos. However most of them are either fake or not functional. Youtube recently added a feature using which it is possible to download youtube videos. But it stores it only for two days.
    We all know that youtube-dl provides us a 100% effective way to download videos from youtube. In this post I will show you how to do this:

    Step1

    Install python. See this Installing python on Android.

    Step2

    Download and transfer youtube-dl to your phone (you can do this directly on your phone if you don't have adb)


    Then open terminal on your android device and do this:


    Now you can easily download youtube videos using youtube-dl from terminal!!