Posts

    Showing posts with label crontab-ui. Show all posts
    Showing posts with label crontab-ui. Show all posts

    Thursday, 9 March 2017

    Introducing mailing in crontab-ui

    Now crontab-ui has option to send mails after execution of jobs along with output and errors attached as text files. This internally uses nodemailer and all the options available through nodemailer are available here.

    Defaults


    To change the default transporter and mail config you can modify config/mailconfig.js.
    var transporterStr = 'smtps://user%40gmail.com:password@smtp.gmail.com';
    
    var mailOptions = {
        from: '"Fred Foo 👥" <foo@blurdybloop.com>', // sender address
        to: 'bar@blurdybloop.com, baz@blurdybloop.com', // list of receivers
        subject: 'Job Test#21 Executed ✔', // Subject line
        text: 'Test#21 results attached 🐴', // plaintext body
        html: '<b>Test#21 🐴</b> results attached' // html body
    };

    Troubleshooting


    Make sure that you have node at /usr/local/bin/node else you need to create a softlink like this
    ln -s [location of node] /usr/local/bin/node

    Setting up crontab-ui on raspberry pi

    In this tutorial I will show you how to setup crontab-ui on raspberry pi.

    Step 1

    Find your architecture
    uname -a
    Linux raspberrypi 4.4.50-v7+ #970 SMP Mon Feb 20 19:18:29 GMT 2017 armv7l GNU/Linux
    
    Note that it is ARMv7. Download and extract latest node.
    wget https://nodejs.org/dist/v7.7.2/node-v7.7.2-linux-armv7l.tar.xz
    tar xz node-v7.7.2-linux-armv7l.tar.xz
    sudo mv node-v7.7.2-linux-armv7l /opt/node

    Step 2

    Remove old nodejs if it is already installed and add the latest node to the $PATH
    sudo apt-get purge nodejs
    echo 'export PATH=$PATH:/opt/node/bin' > ~/.bashrc
    source ~/.bashrc

    Step 3

    Install crontab-ui and pm2. And start crontab-ui.
    npm install -g crontab-ui
    npm install -g pm2
    pm2 start crontab-ui
    Now your crontab-ui must be running. Visit http://localhost:8000 on your browser to see if it is working.

    Step 4 (Optional)

    In order to be able access crontab-ui from outside, you have to forward the port 8000. Install nginx and configure.
    sudo apt-get install nginx
    sudo vi /etc/nginx/sites-available/default
    Paste the following lines in the file:
    server {
        listen 8001;
    
        server_name localhost;
    
        location / {
            proxy_pass http://localhost:8000;
        }
    }
    Restart nginx
    sudo service nginx restart
    Now, crontab-ui must be accessible from outside through port 8001. So, to access crontab-ui, go to
    <ip address of pi>:8001
    You can also setup http authentication by following this.
    Thanks!
    Fork me on Github

    Sunday, 14 June 2015

    Crontab UI: easy and safe way to manage your crontab files

    Editing the plain text crontab is error prone for managing jobs, e.g., adding jobs, deleting jobs, or pausing jobs. A small mistake can easily bring down all the jobs and might cost you a lot of time. With Crontab UI, it is very easy to manage crontab.


    Here are the key features of Crontab UI:

    1. Easy Setup
    2. Safe adding, deleting or pausing jobs. Easy to maintain hundreds of jobs.
    3. Backup your crontabs.
    4. Export crontab and deploy on other machines without much hassle.
    5. Error log support

    Fork me on Github

    Setup

    You have to setup crontab-ui on all the machines on which you want to manage crontab. Note that while running Crontab UI, you have to be on the same user as that of the crontab.

    npm install crontab-ui
    crontab-ui

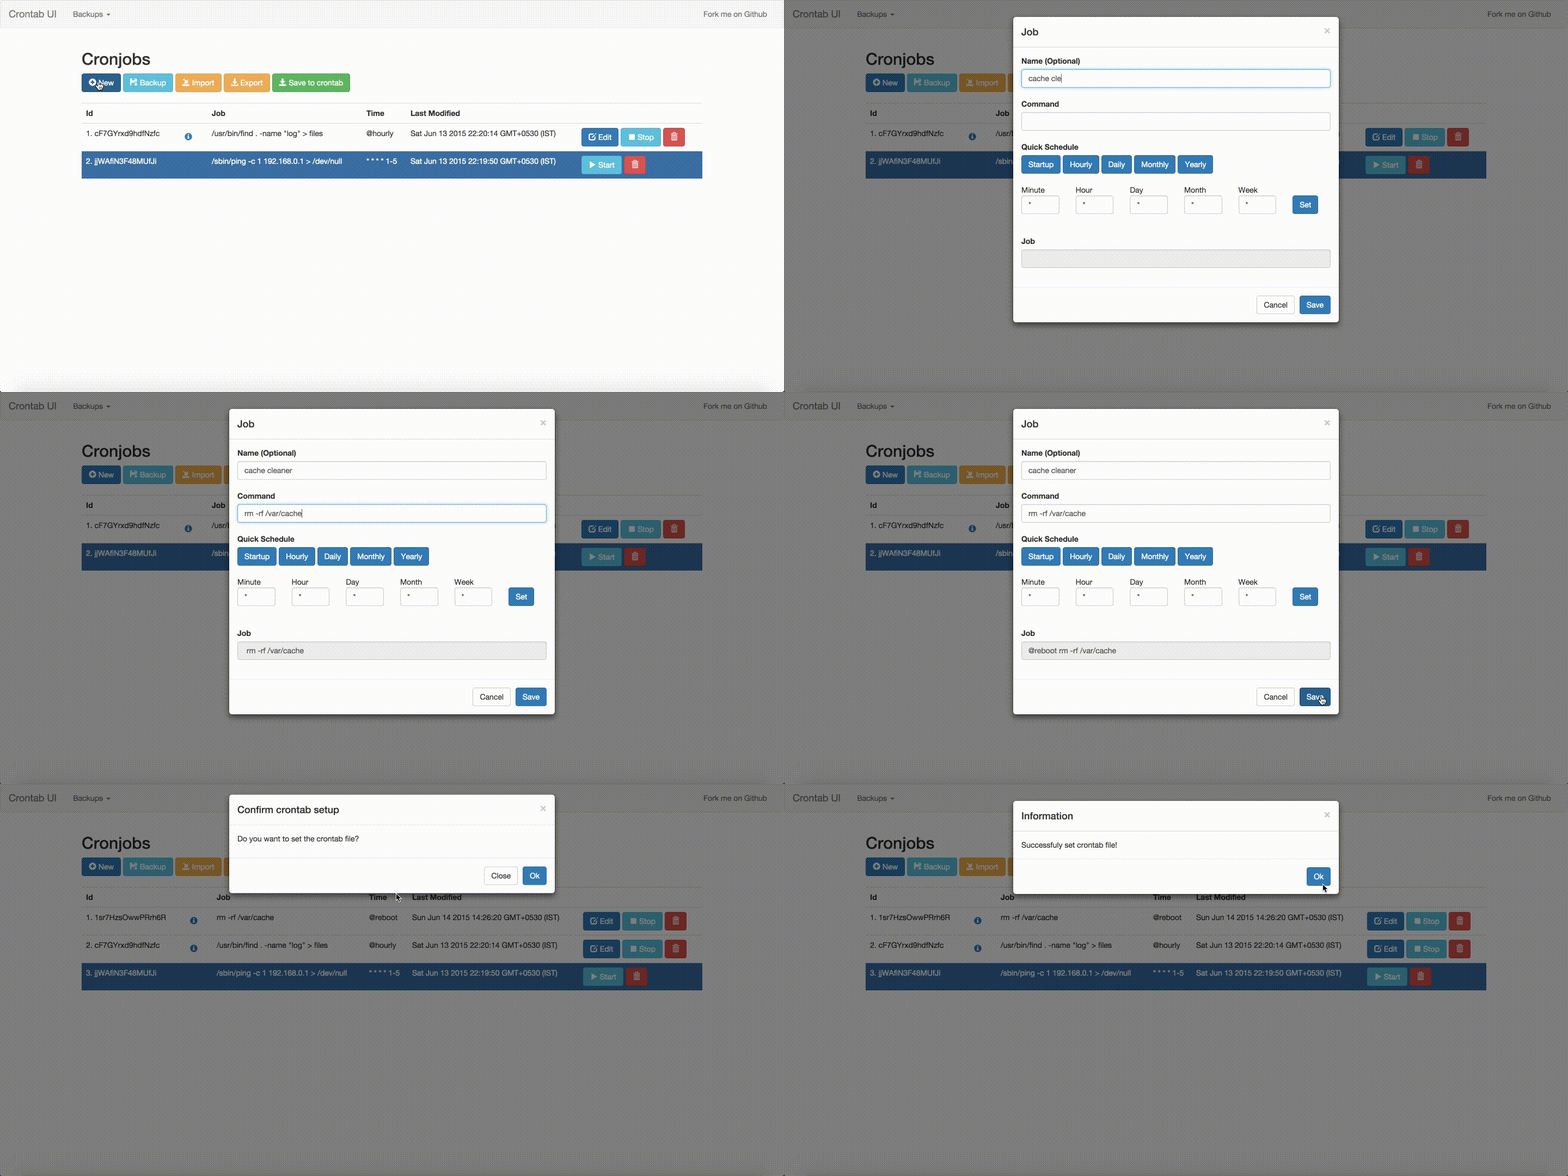
    Adding, deleting, pausing and resuming jobs.

    Once setup Crontab UI provides you with a web interface using which you can manage all the jobs without much hassle.


    Backup and restore crontab

    Keep backups of your crontab in case you mess up.


    Export and import crontab on multiple instances of Crontab UI.


    If you want to run the same jobs on multiple machines simply export from one instance and import the same on the other. No SSH, No copy paste!


    But make sure to take a backup before importing.

    See when the job is going to run next.


    Separate error log support for every job


    These are some of the things I am planning to add in the future


    1. Run jobs as different user in one place.
    2. Profiling jobs.
    3. Importing from existing crontab file.

    Contribute

    Fork Crontab UI and contribute to it. Pull requests are encouraged.