Posts

    Sunday, 21 June 2015

    Play computer games through android wear using Magneto

    I recently wrote an article called "Magneto = Gyroscope + Accelerometer + Geomagnetometer" where in I explained how to use Gyroscope, Accelerometer and Geomagnetometer to map your movements to mouse movements. In this article I will show you how to use Magneto 2.0 to play computer games using your android wear or phone.

    Here is a video of me playing few computer games using my android wear


    How to use it?


    Setup

    Unfortunately, I haven't made a simple way to do this YET. And this is available only for Linux and Mac. If you wan't to give a try you will have to follow all these steps. I am assuming that you have ADT setup.

    Download Magneto apk


    For android wear:
    1. Enable developer options on your android wear and turn on USB debugging. See this to see how to enable bluetooth debugging for your watch.
    2. After you are successfully able to connect to your watch from your computer, install the apk.
      adb install [location to the apk]
    3. You are done. Now go ahead and open it on your wear

    For android phone:
    1. Enable developer options on your android device and turn on USB debugging or ADB over wifi.
    2. Install the apk like any other.
    3. You are done. Now go ahead and open it on your device.
    Linux users have to install xdotool:

    Ubuntu/ Debian users
    sudo apt-get install xdotool
    Fedora users
    sudo yum install xdotool
    Arch users
    sudo packman -S install xdotool

    Start Magneto on computer

    Download this shell script and run it.

    For android wear and linux
    ./nav -lw
    For android wear and OS X
    ./nav -ow
    For android phone and linux
    ./nav -lp
    For android phone and OS X
    ./nav -op

    Calibration

    Calibrate what is left, right, top and bottom.
    1. Hold your device in front of the computer screen. This will be your initial position.
    2. Rotate your hand to left position and click on L. So, this will mark the region beyond it as Left. Then rotate your hand to the right and click on R. This will mark the region beyond it as Right. Similarly, do the same for Top (T) and Bottom(B)


    3. If you feel that you have to redo it, press RESET button and click on the letter. When the letter becomes L (capital L), redo Step 2.

    Playing

    See the video where I am playing Temple Run Online, Tetris and Pacman using my android wear!

    Contributing


    Fork me on github


    There is a lot of scope for improvement. For instance, I haven't written the navigation script for windows. Pull requests are welcome.


    You might have noticed the COMMAND button. It takes voice commands from the user and sends it to the computer. I will talk about that in another article.


    Sunday, 14 June 2015

    Crontab UI: easy and safe way to manage your crontab files

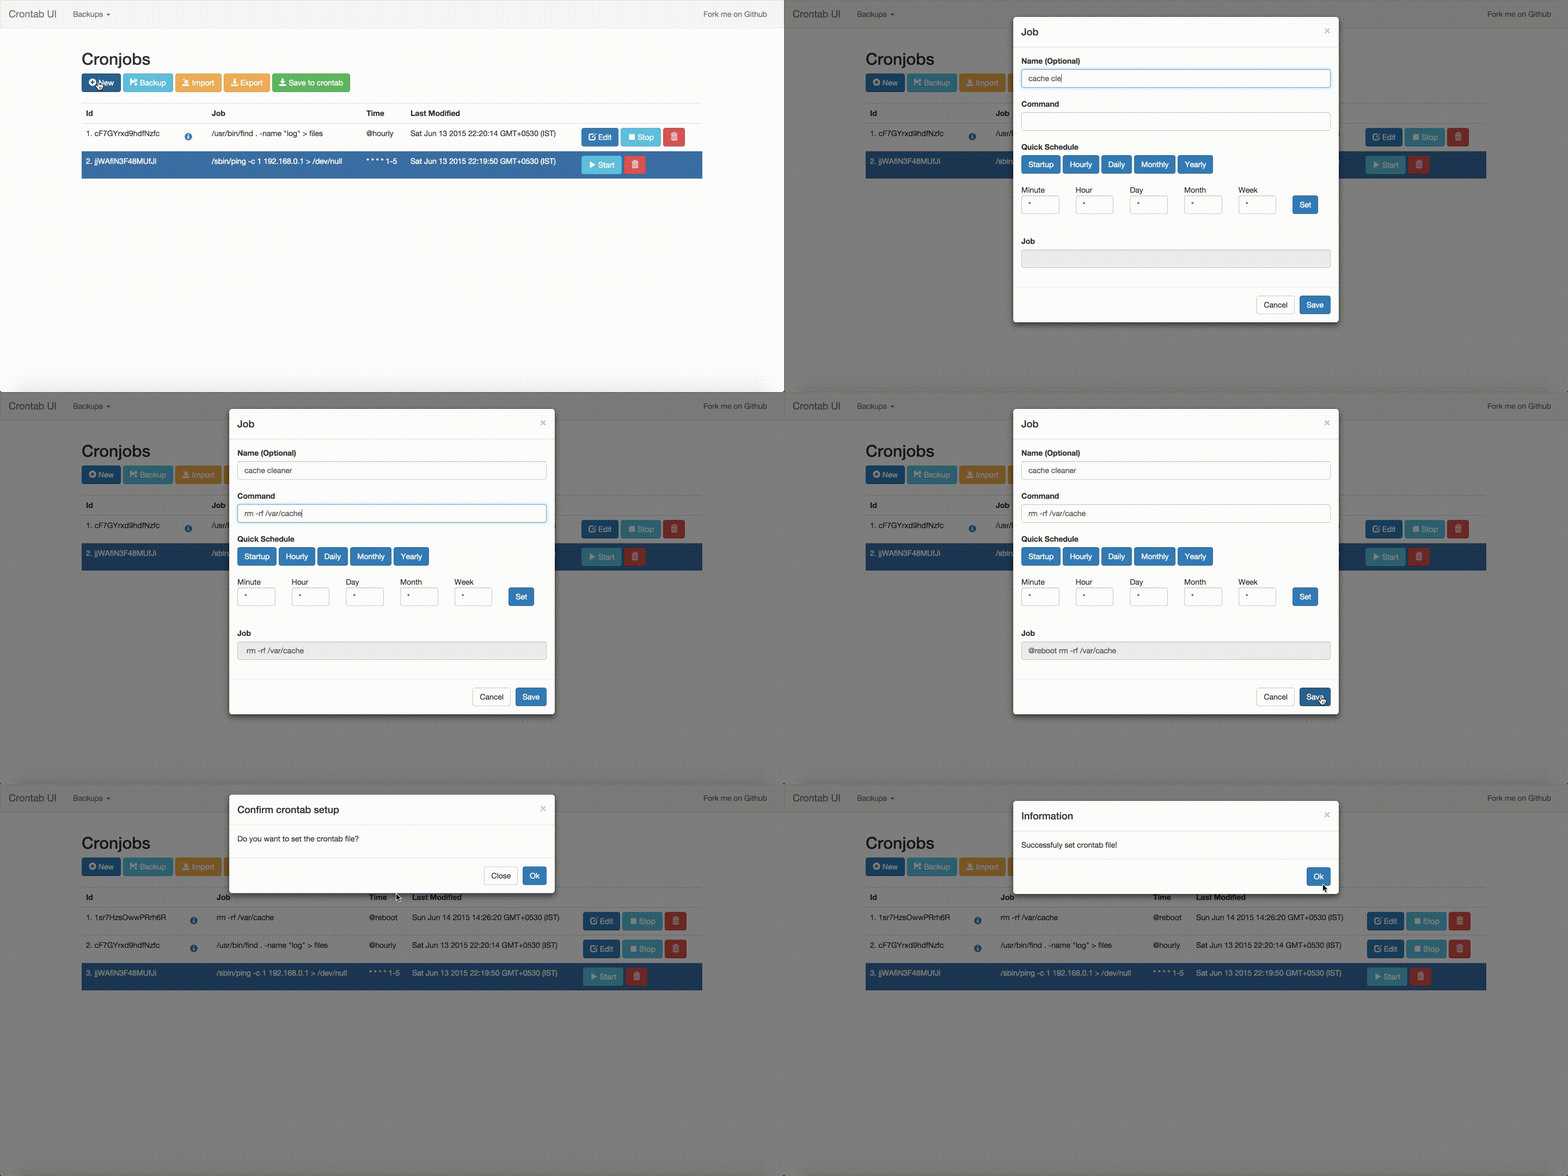
    Editing the plain text crontab is error prone for managing jobs, e.g., adding jobs, deleting jobs, or pausing jobs. A small mistake can easily bring down all the jobs and might cost you a lot of time. With Crontab UI, it is very easy to manage crontab.


    Here are the key features of Crontab UI:

    1. Easy Setup
    2. Safe adding, deleting or pausing jobs. Easy to maintain hundreds of jobs.
    3. Backup your crontabs.
    4. Export crontab and deploy on other machines without much hassle.
    5. Error log support

    Fork me on Github

    Setup

    You have to setup crontab-ui on all the machines on which you want to manage crontab. Note that while running Crontab UI, you have to be on the same user as that of the crontab.

    npm install crontab-ui
    crontab-ui

    Adding, deleting, pausing and resuming jobs.

    Once setup Crontab UI provides you with a web interface using which you can manage all the jobs without much hassle.


    Backup and restore crontab

    Keep backups of your crontab in case you mess up.


    Export and import crontab on multiple instances of Crontab UI.


    If you want to run the same jobs on multiple machines simply export from one instance and import the same on the other. No SSH, No copy paste!


    But make sure to take a backup before importing.

    See when the job is going to run next.


    Separate error log support for every job


    These are some of the things I am planning to add in the future


    1. Run jobs as different user in one place.
    2. Profiling jobs.
    3. Importing from existing crontab file.

    Contribute

    Fork Crontab UI and contribute to it. Pull requests are encouraged.


    Tuesday, 2 June 2015

    Some of the cool vim tricks and tips

    I use vim everyday. So much that even to write notes I use vim!
    Here are some of the awesome tricks I have come across:

    1.  Suppose you have opened a file for which you don't have permission. While saving it will say "E212: Can't open file for writing". Now instead of saving this temporarily in another file and then saving in this file, you can do this:

    :w !sudo tee %

    2.  You can edit binary files like in hexedit 

    :%!xxd


    3. Easy diff between two files. Say there are two files 'a' and 'b'. To find the diff of 'a' with respect to 'b'

    :vert diffs b


    4. See command history

    q:


    5. Execute command while still in vim.

    :! <command>

    Here I am compiling and running cpp file without closing it.


    6. Autocomplete whatever you are typing in insert mode based on the words you have typed before:

    Ctrl+n


    7. Directory Listing without NERDTree

    :vsp %:h

    8. Indenting code

    =<next position>
    For example, 
    To indent the current line, press ==
    To indent the code till next closing flower brace, press =}

    Here is an example of indenting the entire code block. Place the cursor on { and then press =%

    Before

    Indented

    9. Make searching as you type instead of after completing typing the entire thing

    :set incsearch

    10. Download and open source code for a given url

    vim http://google.com

    I usually use this to quickly view responses of my web pages.

    vim http://localhost/path


    I will add more in the future.

    Sources:
    http://vim.wikia.com/wiki/Best_Vim_Tips
    What are the dark corners of Vim your mom never told you about?