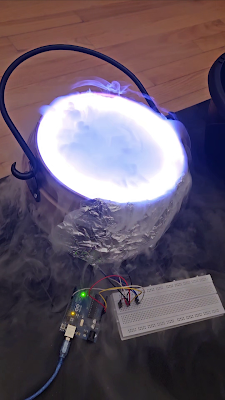
Earlier this year, we had a very fun filled Harry Potter themed gender reveal party. For the reveal, I built a Magic Cauldron which would reveal the gender. Check it out for yourself!
For this I needed:
- A Cauldron.
- WS2812B LED array.
- Aurdino UNO.
- Bread board and jumper wires.
- Dry ice.
- Kasa Smart bulbs
- The Mist.
- Serial Bus.
- LED orchestration.
- Room effect.
The Mist
Dry Ice is solid carbon dioxide which is at a very low temperature of -78.5°C. When put in water at room temperature, it rapidly sublimates to create the fog/ mist effect. The hotter the water, the denser the mist and the quicker the effect occurs. So, it is important to have a balance - I preferred to have water heated up for 10s in microwave before I began. To prevent the mist from spreading too far, place the water in a smaller bowl inside the cauldron.
Make sure to get the dry ice the same day as the event if you don't have the means to store it. Even when stored in the freezer, you will lose a lot it through sublimation. Always handle dry ice with care—never touch it with bare hands, as it can cause instant frostbite—and keep it out of reach of children.
Serial Bus
Enter mode: b: boy, g: girl, d: dry run:
I used the serial bus to relay this information to the Aurdino.
LED orchestration
I used a WS2812B LED array with 60 individually addressable LEDs, controlled through the FastLED.h library. The possibilities of what you can create with it are only limited by your imagination.
There were 4 stages to the reveal build up
1. Lightning
- Every LED has 50% probability of turning on or off.
- Random delay between 10 and 100ms before all LEDs are turned off
- Random delay between 10 and 100ms before we repeat till 10s
2. Brewing portion
- LEDs are green.
- They are turned on in sequence before it resets with a delay.
3. Exponential backoff
This is right before the big reveal so this builds up anticipation. This backfired on me as it made be very nervous 😆
- LEDs are white.
- All LEDs are turned on at the same time before turning off after a delay.
- This delay is reduced exponentially to build up the suspense till it reaches a minimum.
It is hard to capture this in a video because of shutter speed being low on phone camera.
4. Final reveal
All the LEDs are turned on with blue for boy and pink for girl - initially with the same effect from (2) before it settles to one color.